When Technology fails…
We only send out newsletters to people who really want to be a part of this paper crafting community. That’s why, even though it’s a bit annoying, we ask everyone to opt in to our emails TWICE. Once when you request to join our newsletter list, then again when we send out an automated confirmation email.
But we also want to make sure we reach you when you ask to join! So we were quite upset to discover that our automatic opt-in emails had not been going out. Thousands of you signed up but never got the chance to confirm your subscription, so you’ve been out of the loop through no fault of your own. We tried sending everyone another opt-in newsletter, but that also failed miserably: we will spare you the technical details, but let’s just say we enjoy paper much more than html, smpt, dns, spf and all those other acronyms.
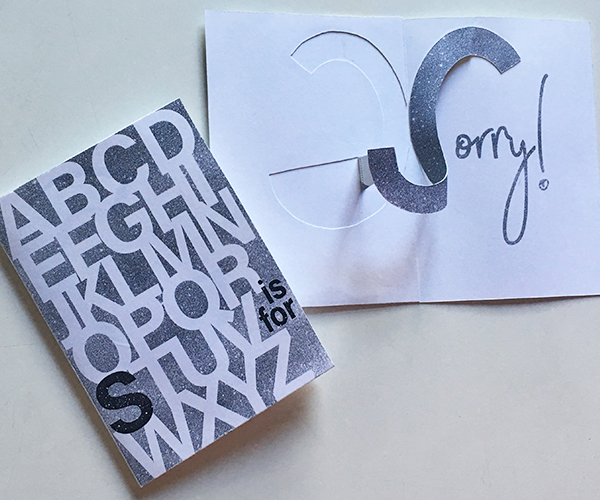
What more can we say? We’re sorry. And to prove it, you can download our appology card for free using the discount code SOSORRY till November 30. 2020.
Subscribe (again)!
Look out for that confirmation email, and make sure you confirm your subscription!
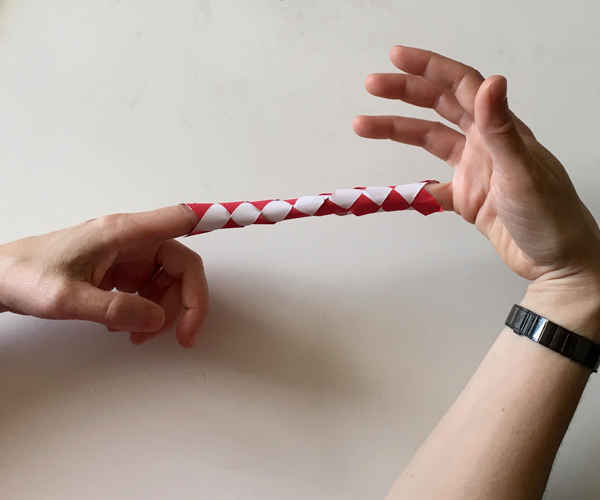
The Chinese finger trap is traditionally made of bamboo, but this amusing toy can be easily crafted from an ordinary sheet of paper. Put your finger in this pretty paper tube and then try to pull it off. The harder you pull, the tighter the weave becomes. You’re trapped! Even the Star Trek character Data was ensnared by this ancient toy. To escape, all you need is a soft touch. Push it gently off your finger, rather than yanking on the other end, and it slips right off.
This traditional toy is also very quick and easy to make! You can download free, printable instructions buy clicking on the button below, or scroll down for online instructions.
Support Make Anything Pop-Up by naming your price, or download printable PDF instructions on how to make a Chinese finger trap for free.
How to make a Chinese Finger Trap
Materials:
- Standard sized paper (letter or A4) in contrasting colors if desired.
- Glue
- A wooden dowel, rod, or pencil which is just a little narrower than your finger. You can also roll a sheet of paper and tape it to create a stiff form of a suitable width.
Tools:
- Ruler
- Thumbtacks or tape
- Scissors or skalpel knife and cutting mat
Steps:
- Cut 4 strips of paper, 1/2” wide (or 13mm) along the long edge of your sheet of paper.
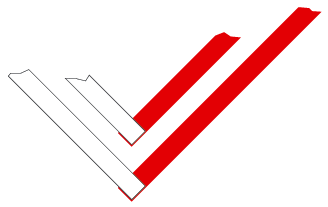
- Make two L shaped pieces by gluing two strips together at a 90° angle.
 3.
3.
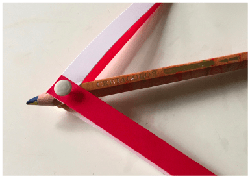
Temporarily attach the L shaped strips of paper to the opposite sides of your dowel using thumbtacks or removable tape.
4. Weave the strips together as shown below, tightening them lightly around your form as you go.

5. When you have woven the finger trap to the desired length (about 5 1/2” or 14cm), glue the strips together, on two opposite sides, where they overlap.
6. Remove woven paper from the form, and cut off the excess paper strips.
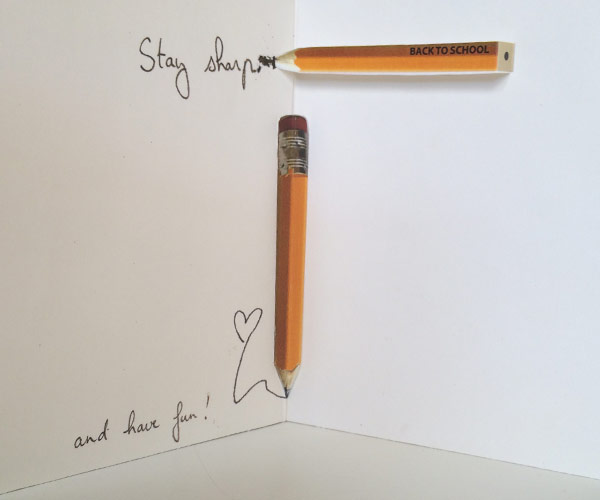
I know mid September is a bit late for a “back to school” card — so to make up for my tardiness you can have this new card for free. From now till September 30th use the coupon code BACK2SCHOOL when you check out.
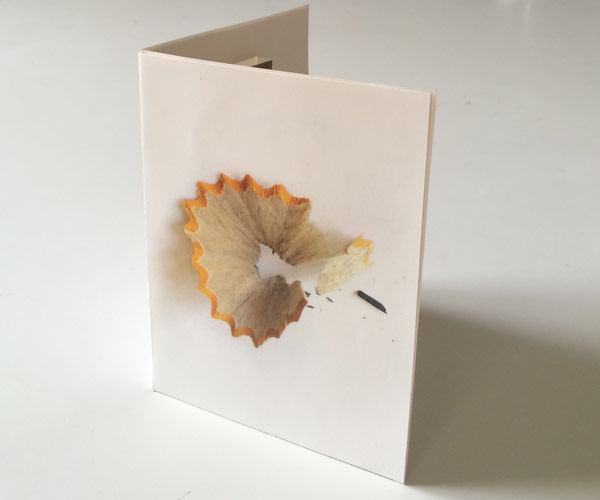
This template is printed on one side of a single sheet of paper so it’s very easy to make a finished card (complete with the front and interior) in just a few minutes. The download includes instructions and two versions, one with the text pictured below, the other blank (the pencils are there but not the text or doodle). This means you can make up your own caption; this doesn’t have to be a “Back to School” card, it can be used for any occasion you dream up.
There are many types of pop-ups, but to keep things from getting too complicated and long, in this tutorial I will only discuss the style known as OA (for Origamic Architecture), and limit myself to cards which are best viewed when they are opened at a 90° angle.
Would-be paper engineers have many craft book options to choose from, and though I have a few of them in my library, I find it much more helpful to learn by making — so my first piece of advice is to download a few of my pop-up cards, make them, and then come back to read the rest of this tutorial. I recommend starting with some of these pop-ups, many of which are free.
Cuts and Folds
 When making a pop-up card all folds must be straight lines.
Mountain folds look like the top of a mountain, and valley folds look like the bottom of a V — like a valley.
Cuts don’t need to be straight lines, but they must go from valley fold, across a mountain top, to the next valley fold.
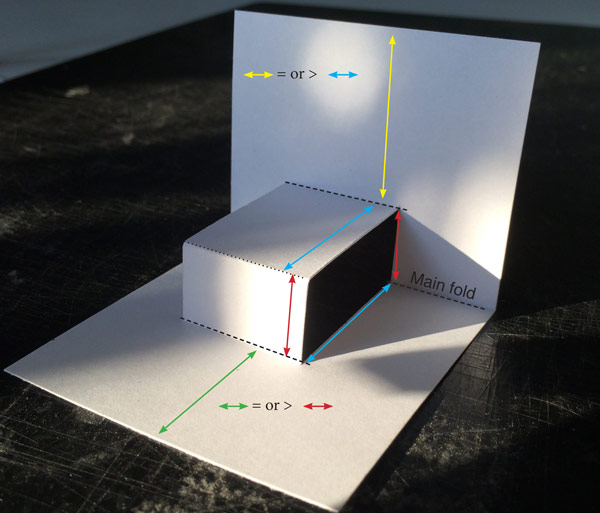
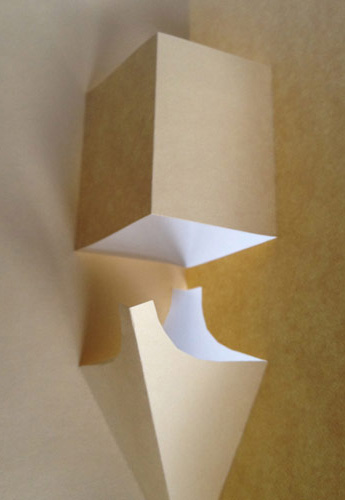
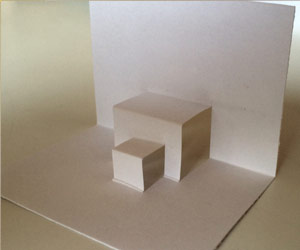
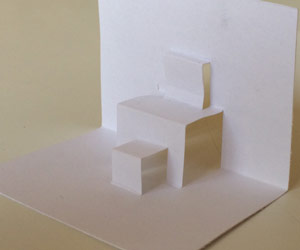
Basic Shape #1: the rectangle
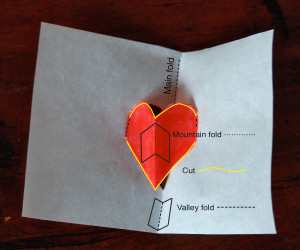
I call this shape a rectangle, but the end result can look like anything: the Brooklyn Bridge, a table or a chair. The heart pictured above is also based on the rectangle shape.
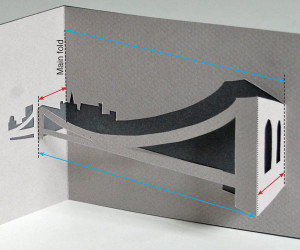
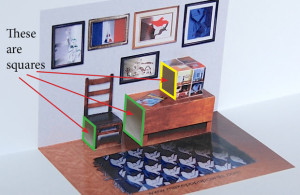
What characterizes the rectangle pop-up is that all the fold lines are parallel. When the card is opened at a 90° angle, the empty shape, when the card is viewed from the side, forms a rectangle (if it forms a square then that pop-up is symmetrical; you can fold it first, then cut over the fold with a pair of scissors).
 In addition to the photos you can download a 2D sketch which might help you visualize how to draw your own shape.
Basic shape #2 The Triangle
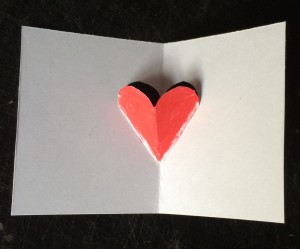
Triangles can be super easy, especially when they are symmetrical like the classic beak above or the heart on the right, but you can also design them so they slant to the side, like the dove pictured below.
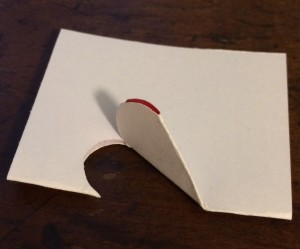
To make a symmetrical triangle you can just fold a piece of paper in half, cut a single slit from the fold, then fold the your shape at any angle, as shown in the second heart photograph. If you’re drawing it, just make the tip converge with the main fold, and draw identical angles on either side of the main fold. (I don’t have a template available for the heart since I just cut that one freehand — and so can you!)

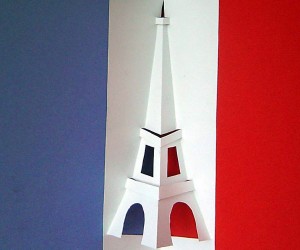
The Eiffel Tower is an example of symmetrical triangles drawn with different angles. You can watch me make it here.
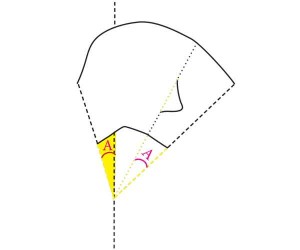
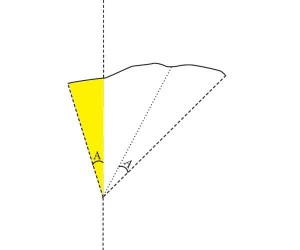
Below are two sketches which show how the asymmetrical triangle pop-ups work — it’s much easier to understand those visually rather than with words.
A big advantage of the triangle is that it gives extra dynamism to your pop-up as you open and close the card: look at the animated photo, below. The face with the flower could easily have been made as a silhouette with a rectangle pop-up, but since it is drawn with a triangle, as you close the card the face leans down towards the flower. Open it, and the face pulls away!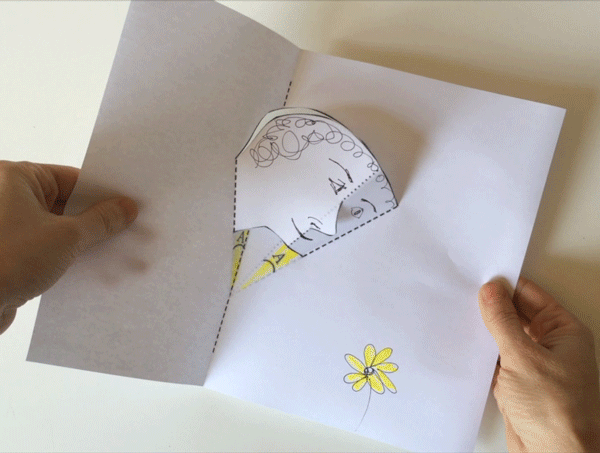
Watch out though, once you move beyond the classic bird beak and try to combine triangles on different planes they can get complicated fast, but as long as you keep your design simple triangles are easy and fun to make.
Combining shapes

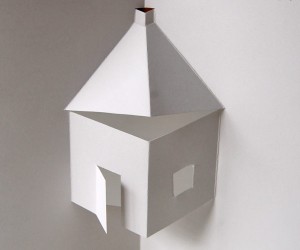
Just by using and combining triangles and rectangles you can obtain an astonishing variety of shapes: the house shows a square combined with a triangle roof, and the ship is almost identical, just upside down. The martini glass is made of a square stem with two symmetrical triangles forming the base and the glass.

When you design any card you’ll be making several drafts, trying out shapes and then adjusting them. To make the Phoenician ship below, for example, in my first draft I adjusted the shape of my standard ship hull (adjusting the bow) then added the characteristic Phoenician square sail — but it looked too chunky, so I re-drew the sail cut lines to make it look like the wind was blowing and puffing it out.
Make a 3D sketch
When I start a new design, first I imagine the shape in my head, then I draw a very rough sketch with paper and pencil and cut it out. I use that pop-up sketch as a guide to draw the cut and fold lines on my computer, then, depending on the situation, I add photos to the design. Sometimes I’ll use photos to trace the cut lines, but those shapes always need to be modified so they will fit my cut and fold lines.
Don’t start a card with the graphics, always start by drawing your cut and fold lines! You can adjust your cut and fold lines to your images later, but you will waste a lot of time and ink if you start out with the graphics. First get the pop-up to work, then decorate.
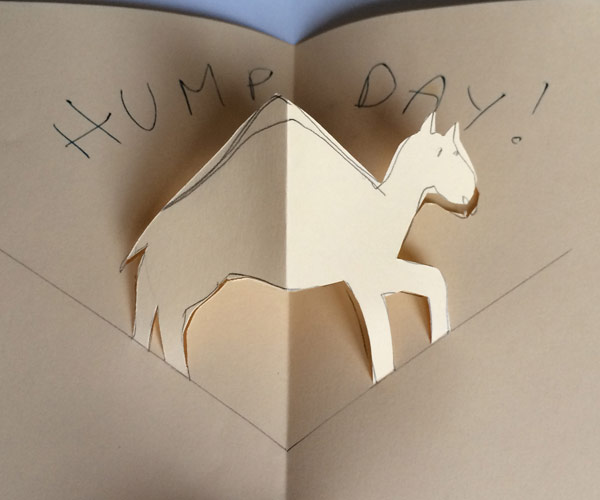
Side note: this camel card is a bit of a hybrid. To make the camel stand up the card is opened at more than 90 degrees, but less than 180 degrees (if opened all the way, the camel lies flat, but at 90 degrees it doesn’t look great either). I designed it this way intentionally to make the card simple and quick to make. No need to fuss with tabs or gluing.
To see this card being made watch the video tutorial.
Irregular shapes
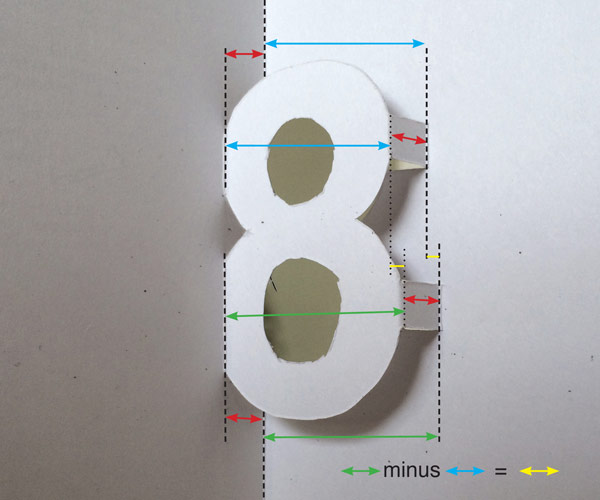
Sometimes a rectangle shape will have one part extend a little farther — for example, in this figure 8, the lower O is wider than the top 0. On the school bus the roof is higher than the front — besides these variations, theses designs are all basically simple rectangular pop-ups.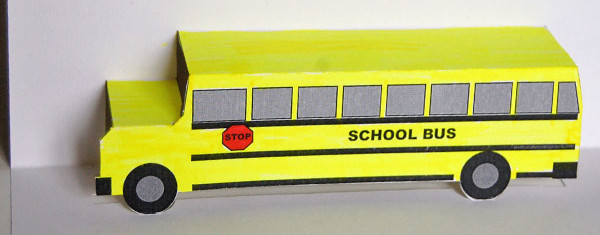
One Step at a Time
Start simple, then add layers. If you first try to draw a complete and complex pop-up you’ll drive yourself crazy, but take it one step at a time and you can make almost anything. Start simple, then add layers. I cannot repeat this enough.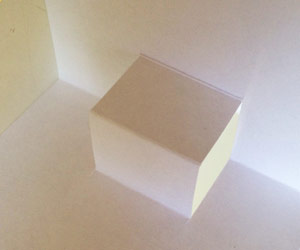
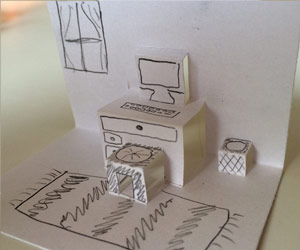
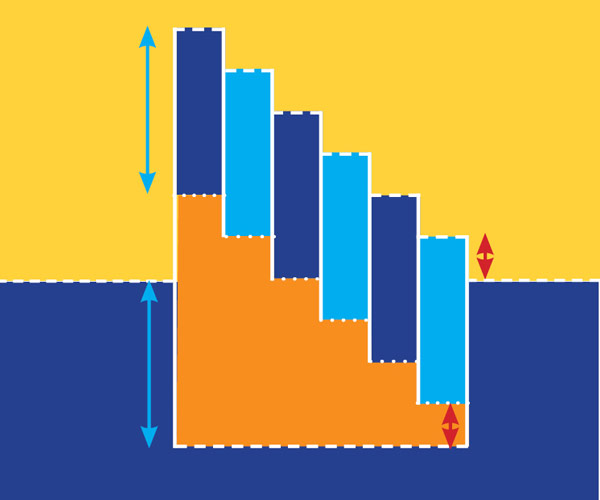
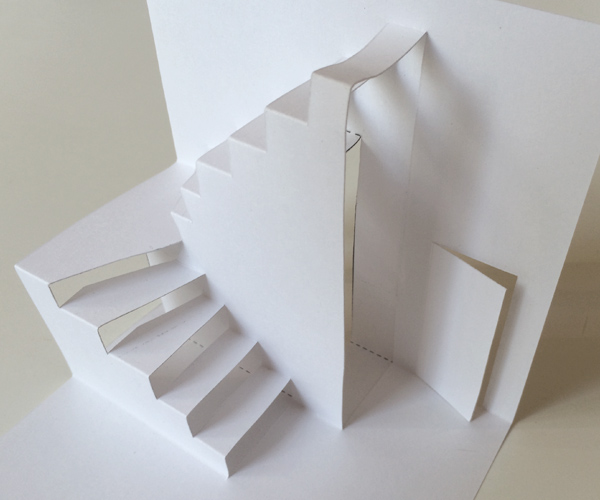
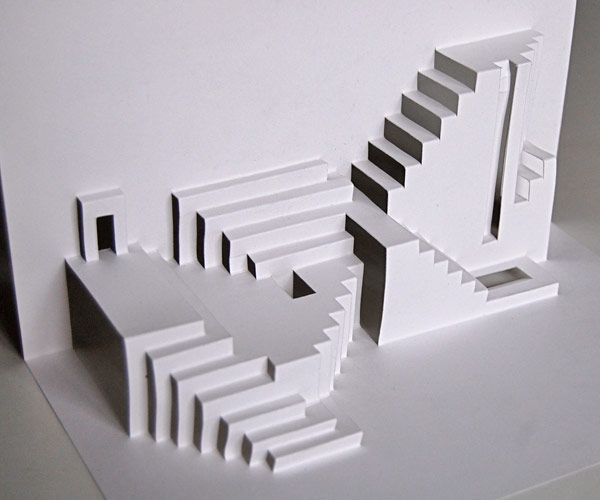
A perfect illustration of what you can achieve by starting simple, then adding layers one step at a time is (of course) the staircase. It is an irregular shape, as explained above, with one vertical plane (orange in the illustration below) and then many horizontal planes, making the steps. This slide show illustrates how you start with one fairly simple shape (stairs), then add to it to make stairs with a landing, then add graphics for extra realism, or instead keep on adding one series of steps after another to make an Eicher-like set of impossible stairs.

Wield your knife wisely
 While you’ve got your knife out you may as well make a few extra cuts: the village and Statue of Liberty pictured here have extra cut-outs which contribute to the sense of depth and space. In one of my favorite cards, the Matterhorn is just a cut-out silhouette, with only the foreground hills popping out of the page. You can also, of course, get a similar effect by drawing graphics but there’s something quite special about an image made from a single sheet of paper with no visible ink.


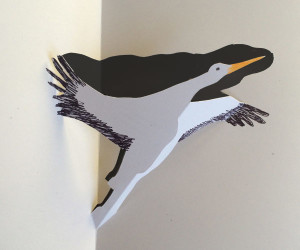
In some cases cutting out the extra paper will remove a distracting shape, as you can see in the stork pop-up. Without the cloud you see and recognize the shape of the beak, which gives the stork an odd shadow. Add a cloud in the sky and you only see the stork.

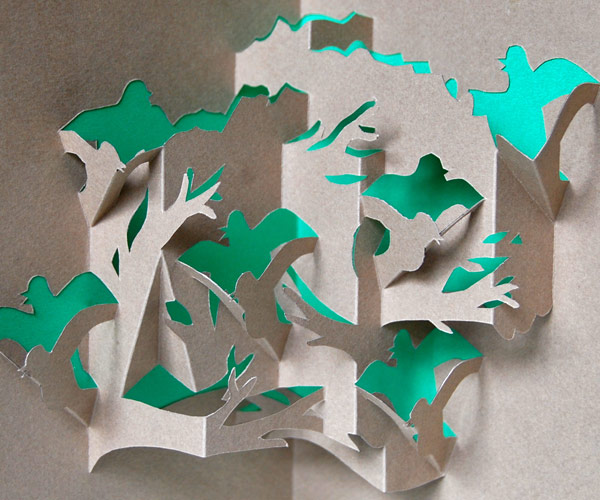
Other times you might like to use that shadow. When I wanted to create the effect of a rush of birds flying out of a tree, the shadows doubled the number of flying birds.
Photographs don’t do this house justice, and it’s hard to explain exactly what comes in the box and how it all comes together — but in just two minutes and thirty seconds not only will you see a close-up of the finished house, you will know exactly what’s in the box and how it’s assembled. You’ll see the concentration on a nine year old boy’s face as he carefully folds one room, oblivious to the fly resting on his hand, and listen to the happy singing of a five year old girl as she discovers the house and immediately starts playing.
Enjoy!
You must be logged in to post a comment.